Thursday, February 27, 2014

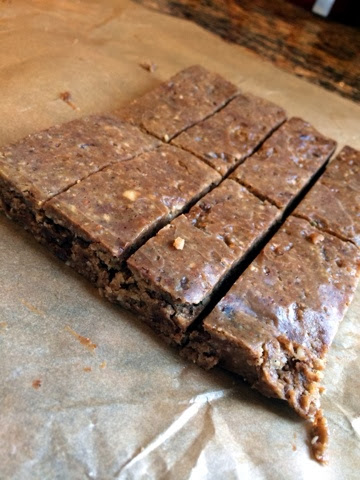
Homemade Peanut Butter Chocolate Chip "Lara Bars"

My oldest has been loving the peanut butter chocolate chip Lara Bars. Which, I am ok with, but they get pricey. I've seen a few good recipes floating around Pinterest, so figured I would combine a couple recipes.

Homemade Peanut Butter & Chocolate Chip "Lara Bars"
I modified this recipe from Against All Grain


Ingredients:

  • 1 teaspoon vanilla
  • 1/4 cup raw honey
  • 1/2 cup natural unsweetened peanut butter (or any nut butter)
  • 2 tablespoons coconut oil
  • 1/2 cup raw almonds
  • 1/2 cup raw walnuts
  • 1/2 cup macadamia nuts
  • 1/2 cup raw pumpkin seeds (without the white outer shell)
  • 5 medjool dates (pitted)
  • 1/4 cup sunflower seeds
  • 1/4 cup shredded coconut, unsweetened
  • 1/4 cup dark chocolate chips

Instructions:

  1. Combine the vanilla, honey, peanut butter, and coconut oil in a saucepan over medium-low heat.
  2. While the mixture is heating, place all of the nuts and dates in a food processor and chop until the mixture resembles course sand.
  3.  Add the shredded coconut and sunflower seeds and pulse a few times until the sunflower seeds are roughly chopped.
  4. Remove the coconut oil mixture from the stove once it has melted, then stir in the nut mixture, along with the chocolate chips. 
  5. Line an 8×8 baking pan with parchment paper, then pour the granola bar mixture into the pan.
  6. Place another piece of parchment on top, and use your palms to press the mixture into the pan evenly. Make sure to pack it down as tightly as possible. This will help the bars bind and not crumble. 
  7. Place in the freezer to set for 2 hours. Lift the parchment paper out of the pan and place on a cutting board. Use a sharp knife to cut the bars into rectangles.
  8. You can store these in the refrigerator for 2 weeks, or the freezer for a few months. If storing in the freezer, remove the bars for about 20 minutes prior to serving.

Tuesday, February 18, 2014

Super Protein Packed Pancakes


I love a good healthy pancake recipe for the littles. It's such a fast, easy, nutritious, and delicious breakfast for them.

This recipe is packed with protein from **pastured eggs, sprouted chia seeds, and banana!  No sugar, just a touch of organic maple syrup to finish!

Super Protein Packed Pancakes

*yeilds 8 silver dollar size pancakes

1 banana mashed

2 pastured eggs

1 tsp sprouted chia seeds
I love This One 

1/2 tsp baking powder

1/2 tsp cinnamon

1/2 tsp vanilla extract

1 tsp coconut flour

1 tsp almond flour

2 pinches of pink sea salt


 Instructions:

-Mash the banana

-Add eggs and whisk well until combined

-Add the rest of the ingredients and whisk again well

-Let mixture sit for 5 min, so that the coconut flour and chia seeds have time to absorb the liquid

-Heat skillet to medium heat and grease pan well with clarified butter (ghee) or grapeseed oil

-Add batter to the pre heated skillet. I find silver dollar size are perfect for the kids and are easier to flip
-Cook until golden on each side. About 2 min per side or less

-Enjoy!!

** If you can get your hands on pastured eggs...do so. They are a bit more expensive, but so much healthier. I can attest to the fact, that pastured eggs taste WAY better than any other. Their yolks are typically orange to deep yellow in color. The Free range I buy on occasion are light yellow. You can tell just by the color that pastured eggs are much more nutrient dense.

Pastured chickens eat what they are supposed to...bugs!  Free range are ok, and Cage free are the least desirable. Cage free may simply mean they get out of their cages for an hour a day. It really means nothing, in my opinion. Still better than conventional eggs though. 


Wednesday, February 12, 2014

Grain Free Soft Tortillas/Crepes


Ok I'm going to come right out and say it...It's not normal for someone to get this giddy and excited about a grain free tortilla. I don't care, I've never claimed to be "normal" ha!

These are like life changing grain free tortillas. Flipping life changing. I'm going a little crazy thinking of all the ways I can use them. Sweet, savory, dare I say sweet and salty....oh my!!!

A little melted cheese and tuna, some avocado cheese and chicken, almond butter and bananas with a little dusting of cocoa powder and maple syrup. Somebody stop me now!
I made ground beef tacos tonight with a little shredded cabbage, raw cheddar cheese, cilantro, and guacamole. Yum!


I modified the recipe from

6 large eggs

3 tablespoons coconut flour, sifted

2 teaspoons melted ghee or butter

1 teaspoon tapioca starch

¼ teaspoon sea salt

Coconut oil or butter for pan
(yields 10 crepes)

Instructions:

  1. Mix crepe ingredients in a Vitamix or food processor... Or whisk the crepe ingredients together in a bowl by hand. Let sit for 10 minutes while the pan heats so the coconut flour can absorb the liquid, then whisk again.
  2. Heat a crepe pan or small nonstick skillet with enameled surface over medium-high heat.
  3. Melt a small amount of oil or butter in the pan, swirling to coat the bottom and sides.
  4. Pour ¼ cup (or less) of the batter into the hot pan, turning the pan in a circular motion with one hand so to spread the batter thinly around the pan. Alternatively, use a spatula to quickly spread the batter. Fill any open spots with a drop of batter to make sure the pan is fully covered.
  5. Cook for 1 minute until the edges start to lift. Gently work a spatula under the crepe and flip it over. Cook on the second side for 15 seconds and turn out on a plate.
  6. Continue with the remaining batter, stacking the crepes on a plate as you work. Add a little more oil to the pan every 3-4 crepes or if they begin to start sticking.

Tuesday, January 28, 2014

Grain Free Chocolate Doughnuts

Who said grain free can't be good!  Omg, these are delicious!  My family has sensitive bellies, but we love sweets...what are we to do?!  Eat grain free chocolate doughnuts of course! 

 Grain Free Chocolate Doughnuts

2 large eggs

1 medium sized banana

1/2 cup almond flour

1/4 cup coconut flour

1/4 cup almond butter 

1/4 cup arrowroot flour/powder

4TBS cocoa powder

4 TBS honey or maple syrup

1 TBS vanilla extract

1/2 tsp baking soda

1/2 tsp baking powder

1/4 tsp sea salt

-Preheat oven to 350

-Prepare your doughnut wells.  I have This one and love it!  Rub good bit of coconut oil in each doughnut well by hand, making sure to coat each one well. 

-Blend all ingredients in Vitamix or food processor....or by hand the old fashioned way. I do like how smooth the batter gets with the blender!

-The batter will be quite thick

- Next put your batter in a gallon size zip lock bag (your making a makeshift pastry piping bag). Cut a very small piece of the tip off. 

- Fill doughnut wells about 3/4 full (I go around twice with the pastry bag)

-Bake 10-12 min

-Let cool in the the pan about 10 min before you carefully remove the doughnuts. 

Topping
You can really top these with just about anything....or eat them plain. 
I melted some chocolate chips, drizzled it over the top, then sprinkled some natural dye sprinkles over the top for the littles of course ;)

Enjoy!


Friday, January 17, 2014

Grain Free Graham Crackers


Graham Crackers:
3/4 cup almond four
1 tsp coconut flour
1/3 cup tapioca starch (flour)
1 egg  OR  1 TBS of ground chia seeds mixed with 3 TBS water ( this is an egg replacer, and also has a wonderful nutritional profile) *chia can be ground using a Vitamix, food processor, spice grinder, or mortar and pestle.   
***I have made both versions and prefer the egg version. Using chia is great for an egg free version of the recipe! and still tastes quite good. 
1/4 tsp baking soda
1/4 tsp baking powder 
pinch of sea salt
2½ tablespoons butter or Ghee softened
1 TBS almond milk
2 teaspoons vanilla extract
2 tablespoons raw honey
Dash of cinnamon
* Optional -I mixed up some Turbinado sugar and cinnamon and sprinkled it on top of the crackers before baking
-Mix all ingridients together well with a wire whisk
-Place bowl in the fridge and allow to chill for 30 min
-Place batter between two pieces of parchment paper on a hard surface
-Roll out quite thin (the thickness a cracker would be)
-Slide the parchment paper onto a cookie sheet
-Remove top layer of paper
-Sprinkle with cinnamon and sugar if you choose 
-Use a pizza cutter to cut whatever shape you like for the crackers. I just did small squares (Don't move the crackers once you cut them, you are basically just scoring the dough and making line templates)
- Bake at 350 degrees for 9-11 min
-I went back over the lines with the pizza cutter once they came out of the oven. 
-Let them rest and cool 10 min or so befor you move them off the cookie sheet. 
-You can also place them in the warm oven for a few hours to make them more crunchy. 
Enjoy!


Friday, January 10, 2014

Immunity Booster - Lemon Ginger "Tea"


I recommend this to anyone who is just getting sick. It's been my go to immune booster this season. I had a super sore throat a few days ago, slugged a few cups of this elixir back and not only felt 100% better in the morning...started feeling better within hours of drinking it. 


Recipe

Juice of half a lemon (I love using Meyer lemons)

About 1 inch of peeled fresh ginger grated. I grate mine using a micro plane. The ginger will settle to the bottom of the tea cup, and I will just drink it up with the last few sips ;)

Big TBS of Raw Honey

-Boil water, add lemon juice and ginger. Let steep a few minutes. When tea has cooled a bit, add the raw honey. You can also add a little cool water to bring down the temp of the water faster. You don't want to cook the honey and loose all of its amazing health qualities. 

Why This Works:

LEMON

Lemons contain lots of antioxidants and vitamin C, which can improve the immune system, and it also balances the levels of alkali and acids in the body. Drinking lemonade or lemon tea regularly will make your body less susceptible to illnesses.
The level of vitamin C in your system is one of the first things to plummet when you are stressed. This is why experts recommended taking extra vitamin C during especially stressful days.  Lemons are also high in potassium, which is good for heart health, as well as brain and nerve function.  They also aid in digestion,detoxify your system by enhancing enzyme function and stimulating your liver, and reduce inflammation in your body. 


GINGER

Ginger is one of the natural home remedies that has actually been tested and researched by the medical community. Ginger has been used for thousands of years in India for many different ailments. Ginger boosts your immune system by warming the body and helps to break down the accumulation of toxins in the organs, particularly in the lungs and sinuses.  Ginger also helps to cleanse the lymphatic system. The lymphatic system is a drainage in the body for toxins. By opening up these lymphatic channels and keeping things clean, ginger prevents the accumulation of the toxins that make you susceptible to infections, especially in the respiratory system. It doesn’t take long to see the benefits of ginger when you have a sore throat and a cold. Ginger is a must-have medicinal food during flu season.
Ginger is also an antioxidant, anti microbial, anti inflammatory. It helps clear congestion, eases throat pain, kills cold viruses, and combats fever.

RAW HONEY

Raw honey  is full of many vitamins and minerals; riboflavin, thiamine, pantothenic acid, pyridoxine, nicotinic acid and vitamin C. In fact, the more pollen in the honey the more Vitamin C it has. Honey has been known to fight colds and respiratory infections. 
Enzymatic activities of honey also produce hydrogen peroxide, which generate highly reactive free radicals which kill bacteria, further contributing to its antibacterial properties.  Raw Honey is an Anti-Bacterial, Anti-Viral, and  Anti-Fungal Substance.  

Thursday, January 9, 2014

Grain Free Cinnamon & Chocolate Chip Muffins


Crazy how some bananas, nut butter and eggs can make a muffin. These are good, and easy to make!

Grain Free Cinnamon & Chocolate Chip Muffins 
Recipe modified from Mindy's Munchkin Menu

Yields 10 large, 24 mini muffins

1 Cup nut butter (almond, peanut, cashew, sunflower seed butter, etc.)
I have made them with sunflower and almond butter. I prefer the almond, but sunflower is good too. 

2 medium sized ripe bananas

2 large eggs

1 Tbsp pure vanilla extract

2 Tbsp raw honey or maple syrup

1/2 tsp baking soda

1 tsp apple cider vinegar

1 Tbsp ground cinnamon

3/4 cup mini chocolate chips or raisins...or both! (I love Enjoy Life allergen free mini chocolate chips)
--------------------------------------------------------------

-Preheat oven to 400 degrees F.

-Place all ingredients except raisins into a blender or food processor. (I used my new Vitamix)


-Blend until well mixed and smooth


-Stir in the chocolate chips or raisins.

-Pour batter into prepared muffin tin (either greased with coconut oil or lined with cupcake liners).

-Cook time: 15 minutes for full size muffins

-Cook 10 min for mini muffins

-Enjoy!


Saturday, January 4, 2014

What Natural Sweeteners Are Best?

If you are anything like me, you have felt overwhelmed by all the selections of natural sweetners out there. There are A LOT of them. Growing up, we had two types of sugar in my house, white and brown. That was that. It's wonderful that there are so many types to choose from, and they are so readily available, but it can be confusing!  Here is a list of some of my favorite natural sweeteners, and a little info on why I don't recommend Agave nectar.

Holistic Mom R.N.'s Favorite Natural Sweetener

1.  Sucant - My favorite sugar to use to date. Sucant is made from sugarcane, and is whole unrefined cane sugar.  The sugar cane juice is extracted manually, then cooled and little brown crystals form.  It is brown, because it still has some of it's molasses content. It has a mild molasses/caramel flavor.  Sucant also has less sucrose than table sugar. It can replace table sugar in any recipe 1:1. 


2.  Rapadura- Very similar to Sucant, as it is also made from sugar cane juice. Rapadura is unrefined dried sugar cane juice.  It contains all of the vitamins and minerals that are normally found in sugarcane juice, namely iron. It replaces sugar 1:1 and adds a molasses flavor and dark color, so it’s great in baked goods like brownies, cookies, and cakes, coffee and black tea.  It does have a pretty strong molasses flavor, so keep that in mind when using it. 


This is a brick of rapadura


3.  Turbinado-  This sugar is often confused with sucanat, but the two are not the same. After the sugarcane juice is extracted, the juice is then boiled, cooled, and allowed to crystallize into granules.  These granules are then refined to a light tan color by washing them in a centrifuge to remove impurities and surface molasses. Turbinado is lighter in color and contains less molasses than both rapadura and sucanat. A popular brand-name of turbinado sugar is Sugar in the Raw, that you often see in every coffee shop.  It replaces sugar 1:1. 

As you can see, the crystals are much larger and formed than sucant and rapadura. It is also much lighter in color. 


4.  Maple Syrup-  I love using maple syrup when I want a liquid sweetener.  I usually buy the lighter grade one (lighter color and milder taste). It can be used as a substitute for sugar in just about any way. It can be used for making cookies, cakes, adding sweetness to smoothies, nut butters, nut milks, and of course...pancakes!  It is known that maple syrup can bring many benefits to the body, including promoting the health of the heart, boosting the immune system, lowering the risk of prostrate cancer and others.


Trader Joes Grade B is great!  It is the most reasonably priced organic maple syrup I have been able to find. 


5.  Raw Honey-  Raw honey is a natural sweetener that is made by bees. It is important that you buy raw honey, so that you can get the many health benefits and nutritional qualities from the honey. If you add it to your tea, let the water cool a bit before adding it. Honey has been used as a sugar substitute for centuries. It has a low glycemic index, and is ideal for those who want to lose weight. I have read, that if you are trying to lose weight, you should take some honey every morning. Honey is rich in antioxidants, which can protect your body from a variety of illnesses. It can also treat insomnia, beautify the skin, help wounds heal and promote digestion.  Wowza!!  We use it a lot here in my house as a natural cough syrup. It is very soothing to the throat when you have an upper respiratory infection.  My favorite sick "tea" is made with hot water, raw honey, ginger, and lemon juice. 
***IMPORTANT!!!!!!  Honey should NOT  be given to infants under one year of age due to the fact that it can carry botulism toxins. ***

This is my favorite brand. It's good quality and quite reasonably priced. 


You might wonder why I didn't add Agave to this list with all it's hype and popularity in the media over the past few years. There are some new concerns over Agave being no better for you than high fructose corn syrup. One of the worst "sugar" substitute offenders.   Agave nectar is produced from the juice of the core of the agave, a succulent plant native to Mexico. Far from a whole food, agave juice is extracted, filtered, heated and hydrolyzed into agave syrup. Vegans often use agave as a honey substitute, although it’s even sweeter and a little thinner than honey. It contains trace amounts of iron, calcium, potassium and magnesium. The fructose content of agave syrup is much higher than that of high fructose corn syrup, which is of concern since some research has linked high fructose intake to weight gain (especially around the abdominal area), high triglycerides, heart disease and insulin resistance. High fructose corn syrup contains 55% fructose while agave nectar syrup contains 90%. Despite this, it has a low glycemic index because of its low glucose content.  

Well, I hope this helped, and makes your day a little sweeter ;)

Tuesday, December 31, 2013

Paleo Grain Free Pancakes -two different recipes


My little guy, has a super sensitive stomach. He really can't eat any grains, not even gluten free ones at this point. His older brother eats gluten free pancakes on occasion, and the poor little guy wants pancakes like big brother.  I started making these for my youngest, but both boys eat these almost every morning. I typically make a double batch.  I just made these up one day, and they surprisingly taste pretty good. I've been experimenting with a few different recipes. The first on (one using eggs). I think tastes the best. Saying that, if you need an egg free recipe, the second one is pretty dang good considering what's in it...or should I say what's missing from it. My little one gobbles both of them up.


Paleo-ish Apple Banana Pancakes -egg version 
*these have more of a classic pancake feel to them

(Yeilds about 8 silver dollar size pancakes)

- 1 banana mashed

- 2 eggs

1/2 tsp cinnamon

1/2tsp baking powder

1/2 tsp vanilla

1 tsp coconut flour

1 tsp almond flour (you can omit this and they will turn out fine)

Pinch of sea salt

Ghee or butter for cooking

Instructions:

- Mash the banana

- Mix together all ingredients

- Heat a skillet to medium heat. Put a good amount of ghee or butter in a pan. Drop by Tablespoonfuls and cook until nice and brown on each side.   Be gentle with them, I find making them on the smaller side helps. 

- Serve with organic real maple syrup. 

Enjoy!


Here is the egg, dairy, nut, and gluten free recipe:


Paleo Apple Banana "Pancakes" -egg, nut, dairy, gluten free recipe

1 medium apple peeled and shredded with a large shred cheese grater

*Optional* shred one small carrot on a fine shred cheese grater

1/2 banana mashed

1 TBS of sunflower seed butter.  Any nut butter would do. The sunflower butter does have a mild flavor. 

1/4 tsp cinnamon

1/4 tsp baking powder

1/4 tsp vanilla

Pinch of sea salt

Ghee or butter for cooking

-Shred the apple and carrot

-Squeeze as much liquid as you can out of the shredded apple and carrot. I used a nut milk bag. You can also use cheesecloth, or gently squeeze between some heavy duty good quality paper towels. Then set in a bowl. 

- Mash the banana and cream together the banana and nut butter until smooth. 

- Mix in the remaining ingredients, and combine the apples and carrots with the banana mixture. 

- Try not to get weirded out by the color. The bananas tend to turn really brown, and make the batter a very dark color ;)

- Heat a skillet to medium high heat. Put a good amount of ghee or butter in a pan. Drop by Tablespoonfuls and flatten out in the pan until nice and brown on each side. 

- Serve with organic real maple syrup. 

Enjoy!


Thursday, October 17, 2013

Whoopie Pie Cupcakes -With Coconut Oil "buttercream" Frosting


Yes I went there!  My oldest has been badgering me to make cupcakes with "Halloween sprinkles" for days now...so we did just that. I just used regular old sprinkles from Target. Got to say though, next time I would plan better and get some without all the food dye and corn syrup :(  Kinda nasty, when i read the ingredients. 
 
If your not a huge fan of coconut flavor, you could substitute the coconut oil frosting for the traditional marshmallow fluff recipe in the original recipe over at Yankee Magazine

I modified a recipe from Yankee Magazine for these whoopie cakes!  The frosting I just made up, and I think it came out amazing!  

Whoopie Pie Cupcakes
 
  • 2 cups all-purpose organic flour
  • 1/2 cup plus 1 TBS organic cocoa powder
  • 1 1/2 teaspoons baking soda
  • 1/2 teaspoon pink sea salt
  • 1/2 cup room temperature coconut oil or room temperature grass fed butter
  • 1/2 cup organic brown sugar 
  • 1/2 cup succant
  • 1 cup buttermilk
  • 1 large egg
  • 1 teaspoon vanilla extract

-Mix the flour, cocoa powder, salt, and baking soda in a medium bowl. Set aside

-Cream together the coconut oil and sugar with an electric mixer until smooth and fluffy

-Add the egg, buttermilk, and vanilla. Mix well

-Slowly add the dry mixture to the wet mixture until combine

-Fill a lined muffin tin with batter about 3/4 full. 

-Makes about 1 1/2 dozen cupcakes

Coconut Oil "buttercream"Frosting:

1 cup coconut oil (soft solid at room temp)

4 cups of organic powdered sugar

1-2 tsps of vanilla extract

-Whip coconut oil with an electric mixer until fluffy

-Add the vanilla extract

-Slowly add in the powder sugar

-Mix on high until fluffy