Saturday, May 31, 2014

Easy Homemade Face Lotion

I have been using coconut oil on my face for over 2 years now, with wonderful results. I wanted to step it up a notch and add some essential oils. 

This was seriously so simple, and took maybe 5-10 min tops!

Here is what you will need; good quality (preferably organic) coconut oil, cocoa butter, and beeswax.  

*I bought all of the above on Amazon!  Be sure to get food grade organic cocoa butter 

The essential oils I used were Young Living Essential Oils; Purification, Lavender, Lemongrass, and Rose Ointment. 

If you are using essential oils I highly recomend using only the highest quality therapeutic grade oils. Young Living Essential Oils are the ones that I recommend and can verify their quality and purity. Contact me to find out more, or if you have any questions. Only buy Young Living oils from a verified distributor.  If you know one...wonderful!  If you don't, I will be happy to order for you. There is too much risk of tampering when you buy them from a third party such as EBay or Amazon. 

INGREDIENTS:

1/4 cup coconut oil

1/8 cup beeswax

1/8 cup cocoa butter

5-6 drops Young Living Purification

5-6 drops Young Living Lavender

5-6 drops Young Living Lemongrass

1/2 tsp Young Living Rose Ointment

DIRECTIONS:

-Heat all ingredients on medium in a saucepan until melted

-Remove from heat and pour into a small bowl 

-Let cool a few min until it starts to harden a bit when you stir it

-Add your oils and stir until smooth

-That's it!


Millet Flour Pancakes -Gluten Free/Grain Free


I'm on a constant quest to make a grain/gluten free pancake that my hungry boys will eat. Millet is a seed not a grain, and to me, tastes like corn meal. It is gluten free, and some will say ok in a paleo diet. I bought millet in the bulk section of my grocery store and made a flour very easily in my Vitamix. A food processor would work as well. You can buy millet flour HERE

INGREDIENTS:

  • 3/4 cup organic millet flour
  • 1/2 under-ripe banana (mashed)
  • 1/2 cup organic milk or almond milk
  • 1 organic pastured egg
  • 1 small pinch of salt
  • 1 teaspoon coconut sugar
  • 1 teaspoon baking powder
  • 3/4 teaspoon cinnamon 
  • 1/4 teaspoon organic nutmeg powder
  • Ghee or coconut oil to coat pan

DIRECTIONS:

- Pre-heat pan to medium heat

- Mash banana and then incorporate egg

- Add the rest of the ingredients and mix well

-Cook pancakes on medium heat until golden on each side. Cover in grass-fed butter and organic maple syrup

-Enjoy!!


Thursday, March 6, 2014

Tips For Packing Healthy Snacks

I have wanted to write about this for a while now, so here we go. 
The key to packing healthy snacks without packing processed food, is preparation and good efficient containers. I found these containers made by Seistema and I LOVE them. They make it super easy to pack healthy snacks. They are BPA free, and I know the verdict is still out on weather BPA free plastic is even that much better than the kind laced with BPA, but I have yet to find a stainless one that works as well as this. Plus, I never heat this up in the microwave (we actually don't have a microwave even) and I really try not to put this in the dishwasher. 

Here is a link if you want to buy these awesome little containers. 

I typically do prep for the snacks/lunch a couple times a week. This week I made some "Lara" snack bars and boiled about a dozen pastured eggs ( add baking soda and salt to the water to make them peel easily)
I also like to cut up a bunch of various veggies and store them in glass containers in the fridge. Another quick tip, boil a pot of water on the stove and pop the cut up veggies in for a minute, the day you will be using them. I find the kids have an easier time eating the raw veggies if I do this. Be sure to flash them with ice cold water immediately after cooking to prevent them from cooking any more.   I usually pack something to dip the veggies in, guacamole is a fan favorite, but they also love hummus, and tzatziki. 


Today we are having carrot sticks, broccoli, sugar snap peas, celery and a boiled pastured egg


On the other side I have homemade snack bars, macadamia nuts, raisins, and plantain chips


Sunday, March 2, 2014

Chicken Tenders - Grain Free


The kids love these, and so do my husband and I!  I freeze them too, and it's a great fast lunch!

Ingredients:

1 Lb organic pastured or free range Chicken breast tenders (you can also just cut a large breast into strips)

1 Cup almond meal

1 Cup shredded Parmesan cheese

1/2 cup coconut flour

2 eggs (beaten)

Pink sea salt and pepper to taste

Really whatever spices you want to add!
I added a tiny bit of turmeric, ground mustard, this 21 season salute from Trader Joes, and just an every day spice mix from TJ's

Instructions:

-Place the coconut flour in a shallow dish

-Mix the almond flour, Parmesan cheese, and spices together and place in another shallow dish

-Beat the eggs in a shallow dish


-Season the chicken with salt and pepper and any spices you choose. 

-Start by layering the chicken between two pieces of plastic wrap. Using a meat mallet  pound them put as thin as you like


-Next, dredge them in the coconut flour, then egg mixture, then finally the "bread crumb" mixture 

-You can do this two different ways. You can either pan fry them in a little grapeseed oil, or the way I like to do it;

-Line a baking sheet with parchment paper and coat generously with grapeseed oil. Lay the chicken fingers down and cover with a little more oil

-Place in a 375 degree oven and cook about 12 min on one side, flip, then cook another 12 min on the other side


Enjoy!!!!!


**P.S. A little tip, I usually freeze half the chicken after I pound it out so I can make a quick lunch later in the week. I haven't tried freezing them after they have been breaded though. 


Grain Free Lasagna


I'm so excited to share this recipe. I have been brainstorming this recipe for a while now...ever since I made my grain free tortillas. 
This is not just eh..."good for a grain free recipe".  This is just a GOOD recipe!  My husband was a little horrified when I told him I was making this for dinner. His skepticism quickly turned into enthusiasm after the first bite. 

If you had told me 1.5 years ago, when I first started dabbling in grain free recipes, that eating this way could be enjoyable...I would have said you were a liar!

I honestly love eating this way. My youngest is intolerant of most grains for the most part, so he has to eat this way. I think it's awesome that the whole family is now eating this way and supporting him. It has also made me become much more creative in the kitchen. 

Hope you enjoy this as much as we did.

Grain Free Lasagna

Ingredients:

About 10-12 (8 inch) grain free tortillas
Find the recipe HERE

1 lb organic grass fed ground beef

1 medium onion (chopped)

1 cup mushrooms (chopped)

2 cloves garlic (chopped)

1 jar of organic tomato sauce (I used a basil marinara)

Dash of fresh grated nutmeg

Pink sea salt and pepper to taste

Oregano or Italian seasoning

1 12 oz container of whole milk ricotta cheese

2 eggs

About 2 cups of grated mozzarella

1 cup fresh grated Parmesan 

-About a cup of chicken stock for deglazing pan

* I also used about half a package of smoked mozzarella cheese (sliced) from trader joes


Instructions:

-Make the "lasagna noodles"  Recipe 


-Heat large pan to medium heat with some grapeseed oil to coat

-Sauté onions about 3 min (add a splash of chicken stock or water to deglaze the pan, and keep the onions from buring and sticking)

-Add chopped mushrooms and cook another 5 min or so

-Next add the garlic, nutmeg, salt and pepper

-Sauté another 5 min or so, until all ingredients soften and brown (scraping and deglazing pan with chicken stock or water as needed)

-Brown the ground beef right in the same pan as the onions and mushrooms. Deglaze with chicken stock as needed

-Add jar of sauce and simmer on low (I like to simmer mine about a 1/2 hour)

-Lightly beat 2 eggs, add ricotta, salt and pepper to taste and a sprinkle of oregano or Italian seasoning.  (set aside)

-Start layering your lasagna in a 13x9 baking dish. 

-Start with a layer of sauce mixture, then three "noodles", then meat mixture again, then ricotta, then cheese mixture, noodles, meat, ricotta, cheese mixture...repeat. 


-End with sauce, then shredded cheese

-Cover with foil and place in a 350 degree oven for about 45 min

-The last few minutes of cooking, remove foil and broil until cheese is brown and bubbly. 


-Let cool 5-10 min before serving

ENJOY!!! ;)


Thursday, February 27, 2014

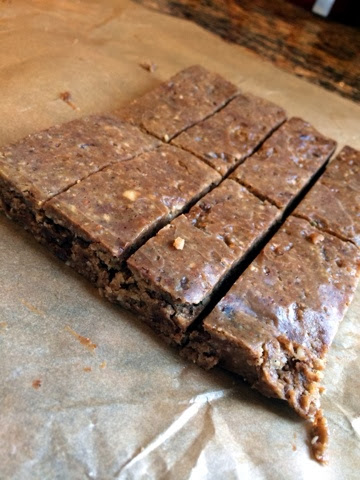
Homemade Peanut Butter Chocolate Chip "Lara Bars"

My oldest has been loving the peanut butter chocolate chip Lara Bars. Which, I am ok with, but they get pricey. I've seen a few good recipes floating around Pinterest, so figured I would combine a couple recipes.

Homemade Peanut Butter & Chocolate Chip "Lara Bars"
I modified this recipe from Against All Grain


Ingredients:

  • 1 teaspoon vanilla
  • 1/4 cup raw honey
  • 1/2 cup natural unsweetened peanut butter (or any nut butter)
  • 2 tablespoons coconut oil
  • 1/2 cup raw almonds
  • 1/2 cup raw walnuts
  • 1/2 cup macadamia nuts
  • 1/2 cup raw pumpkin seeds (without the white outer shell)
  • 5 medjool dates (pitted)
  • 1/4 cup sunflower seeds
  • 1/4 cup shredded coconut, unsweetened
  • 1/4 cup dark chocolate chips

Instructions:

  1. Combine the vanilla, honey, peanut butter, and coconut oil in a saucepan over medium-low heat.
  2. While the mixture is heating, place all of the nuts and dates in a food processor and chop until the mixture resembles course sand.
  3.  Add the shredded coconut and sunflower seeds and pulse a few times until the sunflower seeds are roughly chopped.
  4. Remove the coconut oil mixture from the stove once it has melted, then stir in the nut mixture, along with the chocolate chips. 
  5. Line an 8×8 baking pan with parchment paper, then pour the granola bar mixture into the pan.
  6. Place another piece of parchment on top, and use your palms to press the mixture into the pan evenly. Make sure to pack it down as tightly as possible. This will help the bars bind and not crumble. 
  7. Place in the freezer to set for 2 hours. Lift the parchment paper out of the pan and place on a cutting board. Use a sharp knife to cut the bars into rectangles.
  8. You can store these in the refrigerator for 2 weeks, or the freezer for a few months. If storing in the freezer, remove the bars for about 20 minutes prior to serving.

Tuesday, February 18, 2014

Super Protein Packed Pancakes


I love a good healthy pancake recipe for the littles. It's such a fast, easy, nutritious, and delicious breakfast for them.

This recipe is packed with protein from **pastured eggs, sprouted chia seeds, and banana!  No sugar, just a touch of organic maple syrup to finish!

Super Protein Packed Pancakes

*yeilds 8 silver dollar size pancakes

1 banana mashed

2 pastured eggs

1 tsp sprouted chia seeds
I love This One 

1/2 tsp baking powder

1/2 tsp cinnamon

1/2 tsp vanilla extract

1 tsp coconut flour

1 tsp almond flour

2 pinches of pink sea salt


 Instructions:

-Mash the banana

-Add eggs and whisk well until combined

-Add the rest of the ingredients and whisk again well

-Let mixture sit for 5 min, so that the coconut flour and chia seeds have time to absorb the liquid

-Heat skillet to medium heat and grease pan well with clarified butter (ghee) or grapeseed oil

-Add batter to the pre heated skillet. I find silver dollar size are perfect for the kids and are easier to flip
-Cook until golden on each side. About 2 min per side or less

-Enjoy!!

** If you can get your hands on pastured eggs...do so. They are a bit more expensive, but so much healthier. I can attest to the fact, that pastured eggs taste WAY better than any other. Their yolks are typically orange to deep yellow in color. The Free range I buy on occasion are light yellow. You can tell just by the color that pastured eggs are much more nutrient dense.

Pastured chickens eat what they are supposed to...bugs!  Free range are ok, and Cage free are the least desirable. Cage free may simply mean they get out of their cages for an hour a day. It really means nothing, in my opinion. Still better than conventional eggs though. 


Wednesday, February 12, 2014

Grain Free Soft Tortillas/Crepes


Ok I'm going to come right out and say it...It's not normal for someone to get this giddy and excited about a grain free tortilla. I don't care, I've never claimed to be "normal" ha!

These are like life changing grain free tortillas. Flipping life changing. I'm going a little crazy thinking of all the ways I can use them. Sweet, savory, dare I say sweet and salty....oh my!!!

A little melted cheese and tuna, some avocado cheese and chicken, almond butter and bananas with a little dusting of cocoa powder and maple syrup. Somebody stop me now!
I made ground beef tacos tonight with a little shredded cabbage, raw cheddar cheese, cilantro, and guacamole. Yum!


I modified the recipe from

6 large eggs

3 tablespoons coconut flour, sifted

2 teaspoons melted ghee or butter

1 teaspoon tapioca starch

¼ teaspoon sea salt

Coconut oil or butter for pan
(yields 10 crepes)

Instructions:

  1. Mix crepe ingredients in a Vitamix or food processor... Or whisk the crepe ingredients together in a bowl by hand. Let sit for 10 minutes while the pan heats so the coconut flour can absorb the liquid, then whisk again.
  2. Heat a crepe pan or small nonstick skillet with enameled surface over medium-high heat.
  3. Melt a small amount of oil or butter in the pan, swirling to coat the bottom and sides.
  4. Pour ¼ cup (or less) of the batter into the hot pan, turning the pan in a circular motion with one hand so to spread the batter thinly around the pan. Alternatively, use a spatula to quickly spread the batter. Fill any open spots with a drop of batter to make sure the pan is fully covered.
  5. Cook for 1 minute until the edges start to lift. Gently work a spatula under the crepe and flip it over. Cook on the second side for 15 seconds and turn out on a plate.
  6. Continue with the remaining batter, stacking the crepes on a plate as you work. Add a little more oil to the pan every 3-4 crepes or if they begin to start sticking.

Tuesday, January 28, 2014

Grain Free Chocolate Doughnuts

Who said grain free can't be good!  Omg, these are delicious!  My family has sensitive bellies, but we love sweets...what are we to do?!  Eat grain free chocolate doughnuts of course! 

 Grain Free Chocolate Doughnuts

2 large eggs

1 medium sized banana

1/2 cup almond flour

1/4 cup coconut flour

1/4 cup almond butter 

1/4 cup arrowroot flour/powder

4TBS cocoa powder

4 TBS honey or maple syrup

1 TBS vanilla extract

1/2 tsp baking soda

1/2 tsp baking powder

1/4 tsp sea salt

-Preheat oven to 350

-Prepare your doughnut wells.  I have This one and love it!  Rub good bit of coconut oil in each doughnut well by hand, making sure to coat each one well. 

-Blend all ingredients in Vitamix or food processor....or by hand the old fashioned way. I do like how smooth the batter gets with the blender!

-The batter will be quite thick

- Next put your batter in a gallon size zip lock bag (your making a makeshift pastry piping bag). Cut a very small piece of the tip off. 

- Fill doughnut wells about 3/4 full (I go around twice with the pastry bag)

-Bake 10-12 min

-Let cool in the the pan about 10 min before you carefully remove the doughnuts. 

Topping
You can really top these with just about anything....or eat them plain. 
I melted some chocolate chips, drizzled it over the top, then sprinkled some natural dye sprinkles over the top for the littles of course ;)

Enjoy!


Friday, January 17, 2014

Grain Free Graham Crackers


Graham Crackers:
3/4 cup almond four
1 tsp coconut flour
1/3 cup tapioca starch (flour)
1 egg  OR  1 TBS of ground chia seeds mixed with 3 TBS water ( this is an egg replacer, and also has a wonderful nutritional profile) *chia can be ground using a Vitamix, food processor, spice grinder, or mortar and pestle.   
***I have made both versions and prefer the egg version. Using chia is great for an egg free version of the recipe! and still tastes quite good. 
1/4 tsp baking soda
1/4 tsp baking powder 
pinch of sea salt
2½ tablespoons butter or Ghee softened
1 TBS almond milk
2 teaspoons vanilla extract
2 tablespoons raw honey
Dash of cinnamon
* Optional -I mixed up some Turbinado sugar and cinnamon and sprinkled it on top of the crackers before baking
-Mix all ingridients together well with a wire whisk
-Place bowl in the fridge and allow to chill for 30 min
-Place batter between two pieces of parchment paper on a hard surface
-Roll out quite thin (the thickness a cracker would be)
-Slide the parchment paper onto a cookie sheet
-Remove top layer of paper
-Sprinkle with cinnamon and sugar if you choose 
-Use a pizza cutter to cut whatever shape you like for the crackers. I just did small squares (Don't move the crackers once you cut them, you are basically just scoring the dough and making line templates)
- Bake at 350 degrees for 9-11 min
-I went back over the lines with the pizza cutter once they came out of the oven. 
-Let them rest and cool 10 min or so befor you move them off the cookie sheet. 
-You can also place them in the warm oven for a few hours to make them more crunchy. 
Enjoy!